Modes and optimal sail changes
29 October 2026
You have your gennaker up, and it turns out you can juuuust about lay the next mark while being on the cusp of wiping out. The jib would maybe be almost as fast, but you continue anyway; peeling is for wimps. Well, is this really the fastest way? Is sailing lower and faster and then switching to the jib in the end to sail much higher to lay the mark better?
Let’s get unnecessarily detailed here. Let’s start with a fictive polar diagram of a boat with a jib and gennaker. The gennaker is responsible for the part of the polar in the downwind section, and the jib is responsible for the part in the upwind section. At some point, they intersect, and the sails are equally quick. That is usually around the time where we decide to switch. Let’s assume we want to go somewhere that calls for a TWA just at that crossover. This is shown in Figure 1.
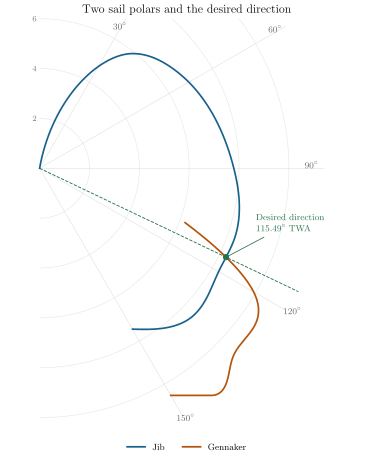
But there is a conspicuous dent in the combined polar near that crossover. We could sail lower and faster under gennaker for part of the leg, then change to jib and sail higher to lay the mark.
The idea is to find the two sail-and-TWA combinations that make this route as fast as possible. We call those optimal combinations modes. So how do we know what the optimal modes are? The polar diagram gives us a way to find that.
Straight lines give an equivalent polar
First of all, if you pick any two points on a polar and sail first at one point and then at another with some fraction of time between them, then you will sail on an effective polar that is a straight line between them. This is shown in Figure 2.
For example, spend half the time at A and half at B, both on the jib polar. Draw half the velocity at A and half the velocity at B from the origin, then complete the parallelogram with parallel copies of those arrows. Its diagonal gives the average velocity at P, exactly halfway along the straight line from A to B. More generally, spending a fraction of the time at A gives
Changing moves P along that line. These are fractions of time, not distance.
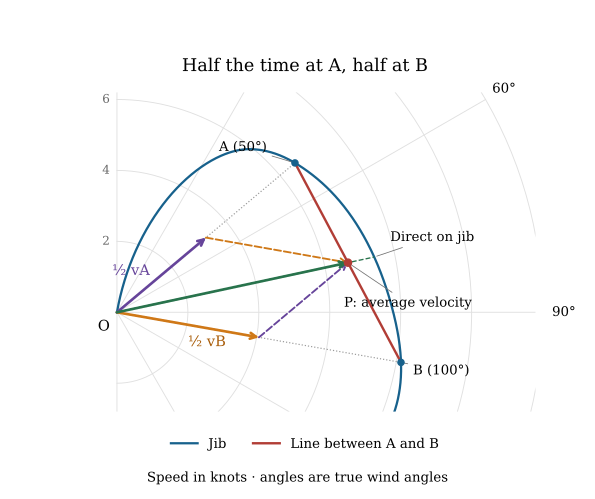
But here, the straight line between the two points is wholly inside the polar, and so it is slower. But any time you can draw a line between two points on the polar that lies outside the polar, it will be faster to switch modes between the two endpoints of the line. This can only happen if there are dents in the polar. These dents often sit between two sail choices. The optimal modes are endpoints that make the line between them as far outside the normal polar as possible, and that happens if the line is tangential to the polar at both points. These two points are the optimal modes. This is shown in Figure 3.
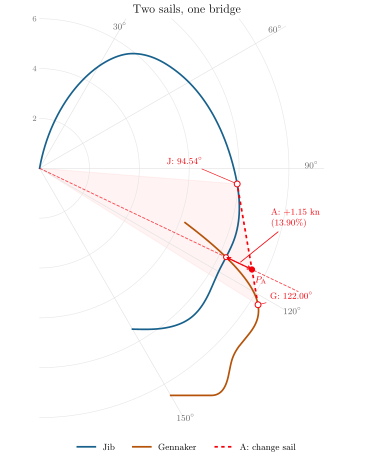
In this example, we want to go in a direction that lies exactly on the crossover between the two sails, where both sails give the same speed. For these polars, this is the worst direct-sailing case because the dent in the polar is so deep here. Sailing between the modes cuts the sailing time by a whopping about 12%, despite sailing a little farther. The modes are each much more comfortable under each sail. So you will get away from forcing the gennaker too high or feeling underpowered under jib.
Two boats from A to B
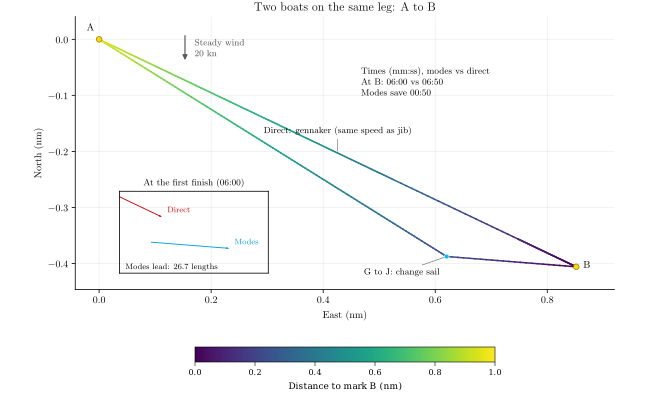
To illustrate the previous case, I want to show how this looks as a track. This is shown in Figure 4. Both boats start at A and sail to B. The direct boat holds the gennaker on the crossover heading. The other boat is sailing in modes.
Conclusion
So there you have it. If you can identify the modes for your boat and sail between them, there is a lot to gain over just sailing with one sail until it becomes untenable and then changing.